Partition LwVM table
The iBoot exploit discussed in this writeup is about a stack overflow caused by incorrectly controlled recursivity in some functions of the HFS+ driver used in iOS 7.x iBoot versions and probably older ones as well. A recursive function is a function that call itself inside itself. The bug is triggered in the HFS+ routines of the bootloader, when it attemps to read a file from a mounted HFS+ file system. A recursion starts when iBoot HFS+ driver parses a high value root node of B-Tree headers (catalog and extents) or drilling down a file path of a certain number of directory levels (tree depth).
Such kind of iBoot exploits that are triggered from file system have some important considerations when implemented. If the hacked HFS+ file system is used as System partition for iOS, iBoot might not be able to mount that file system to search for the kernelcache or upgrade routine images (in case of an OTA update). That hacked HFS+ file system should only be used to trigger the exploit, not to be mounted.
To get around of this issue, we are going to create a third partition and set it as the boot one. Then, iBoot will try mount the hacked HFS+ file system of that third partition and trigger the exploit from there instead of mounting the one of the System partition by default.
Before you attempt to re-partition the disk of your iOS device, I recommand you read the partition LwVM table guide I wrote for my iOS multiboot writeup and also the one made specifically for the iOS 5.x HFS+ Heap Buffer Overflow here to give you a basic idea of the process. The partitionning I'm going to do for this writeup is almost the same as what we do for a regular multiboot, but if you want to resize the system partition of the main iOS, you might refer to the HFS+ heap buffer overflow guide.
The minimum of partitionning required is to get two small additional partitions, one to store post-exploitation boot files and another one for the hacked HFS+ file system that will trigger the exploit. In total, we will have four partitions. However, I would recommand to create two additional ones for a dualboot setup along with the exploit if you want to run another iOS system without destroying the iOS 7.x one we use for the implementation. Keeping it could help recover from a bootloop in case something goes wrong with the exploit.
We will do re-partitionning in four steps.
- Calculate the size of partitions according to our projected configuration.
- Resize the LwVM container of the data partition.
- Delete main system data partition, then recreate it with the new size you want. This will be a dangerous operation, just saying.
- Create new partitions, two for the exploit, and two for a dualboot setup.
iPad-p102ap#gptfdisk /dev/rdisk0s1
To obtain the current list of partitions :gptfdisk>p
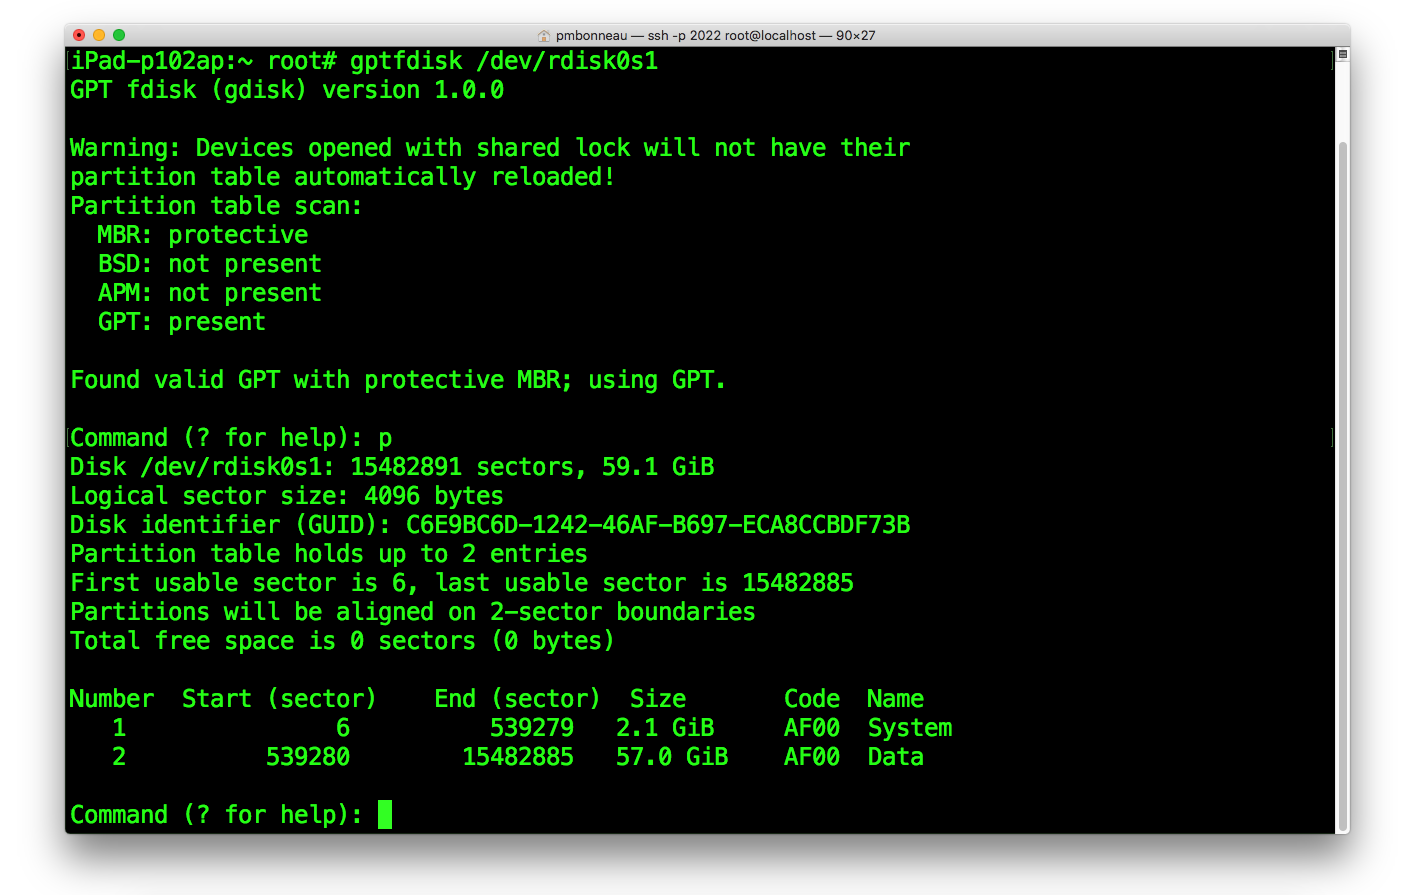
This will print the current partition configuration. On the second line, we can see that /dev/rdisk0s1 has a total capacity of 15482891 sectors. The third line tells us that our logical sector size is 4096, so each sectors have a size of 4096 bytes. We can calculate the size in bytes of /dev/rdisk0s1 by multiplicating the number of sectors by the logical sector size. For this iPad, we get a size of 59.1 GB, which is tells us this a 64 GB device.
15482891 * 4096 = 63417921536 bytes, which means this is a 64 GB iPad.
Now, let's plan the size we will give for each of our partitions to give us an idea about if everything we want will fit properly accordig to the available space we have on the disk. Create a file named disk_partitions.txt in your iOS 7.0.4 folder, and calculate the size of each partitions (including the two existing ones) like this.
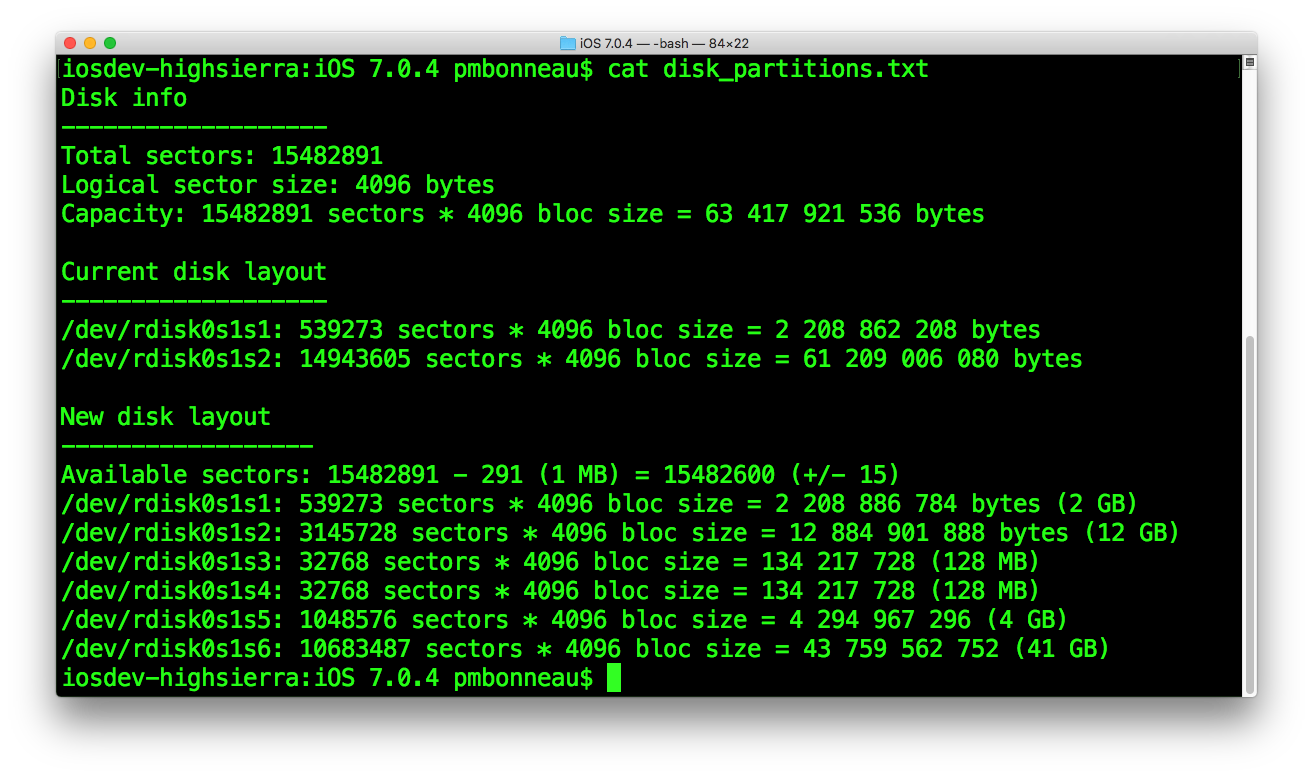
When you plan the new disk layout, the total of sectors allocated for partitions must not be greater than your available sectors minus a "safe zone" of somewhat like one megabyte. Also, once that "safe zone" substracted from available sectors, also consider a gap of +/- 15 sectors because when we create new partitions, the first sector is not always exactly what we calculed by a few additional sectors. Here is a list of partitions I plan to create for my iPad, remember that system and data partition for a secondary iOS version are facultative.
- /dev/rdisk0s1s1 : System partition of iOS 7.0.4
- /dev/rdisk0s1s2 : Data partition of iOS 7.0.4
- /dev/rdisk0s1s3 : Boot partition for post-exploitation
- /dev/rdisk0s1s4 : Exploit partition
- /dev/rdisk0s1s5 : System partition for a secondary iOS (not required)
- /dev/rdisk0s1s6 : Data partition for a secondary iOS (not required)
The boot partition for post-exploitation doesn't have to be big as it will only contains a secondary iBoot image, which is usually less than 1 MB, plus maybe some little extras. A size of 128 MB is more than enough for the HFS+ formatting and our needs. The exploit partition also doesn't have to be big, it only requires 512 KB for a bare-bones HFS+ file system that we will manually write on it later. I would still set it to a reasonable minimal size of 128 KB.
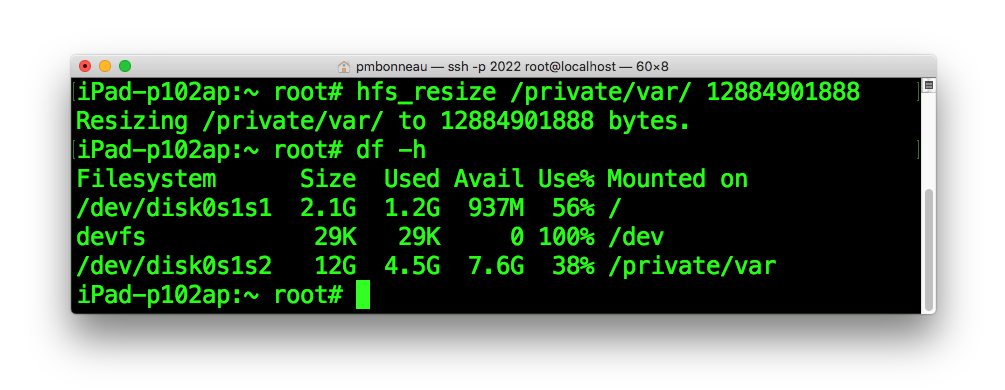
We will use hfs_resize to shrink the LwVM container of the data partition.iPad-p102ap#hfs_resize [mount point] [capacity in bytes]
The mount point is the folder where your disk device is mounted. For iOS, the data partition is always mounted in /private/var of the root filesystem. We already have calculated the new size of our Data partition, 12884901888 bytes (12 gb). Our command to reduce the data partition would be like this.iPad-p102ap#hfs_resize /private/var/ 12884901888
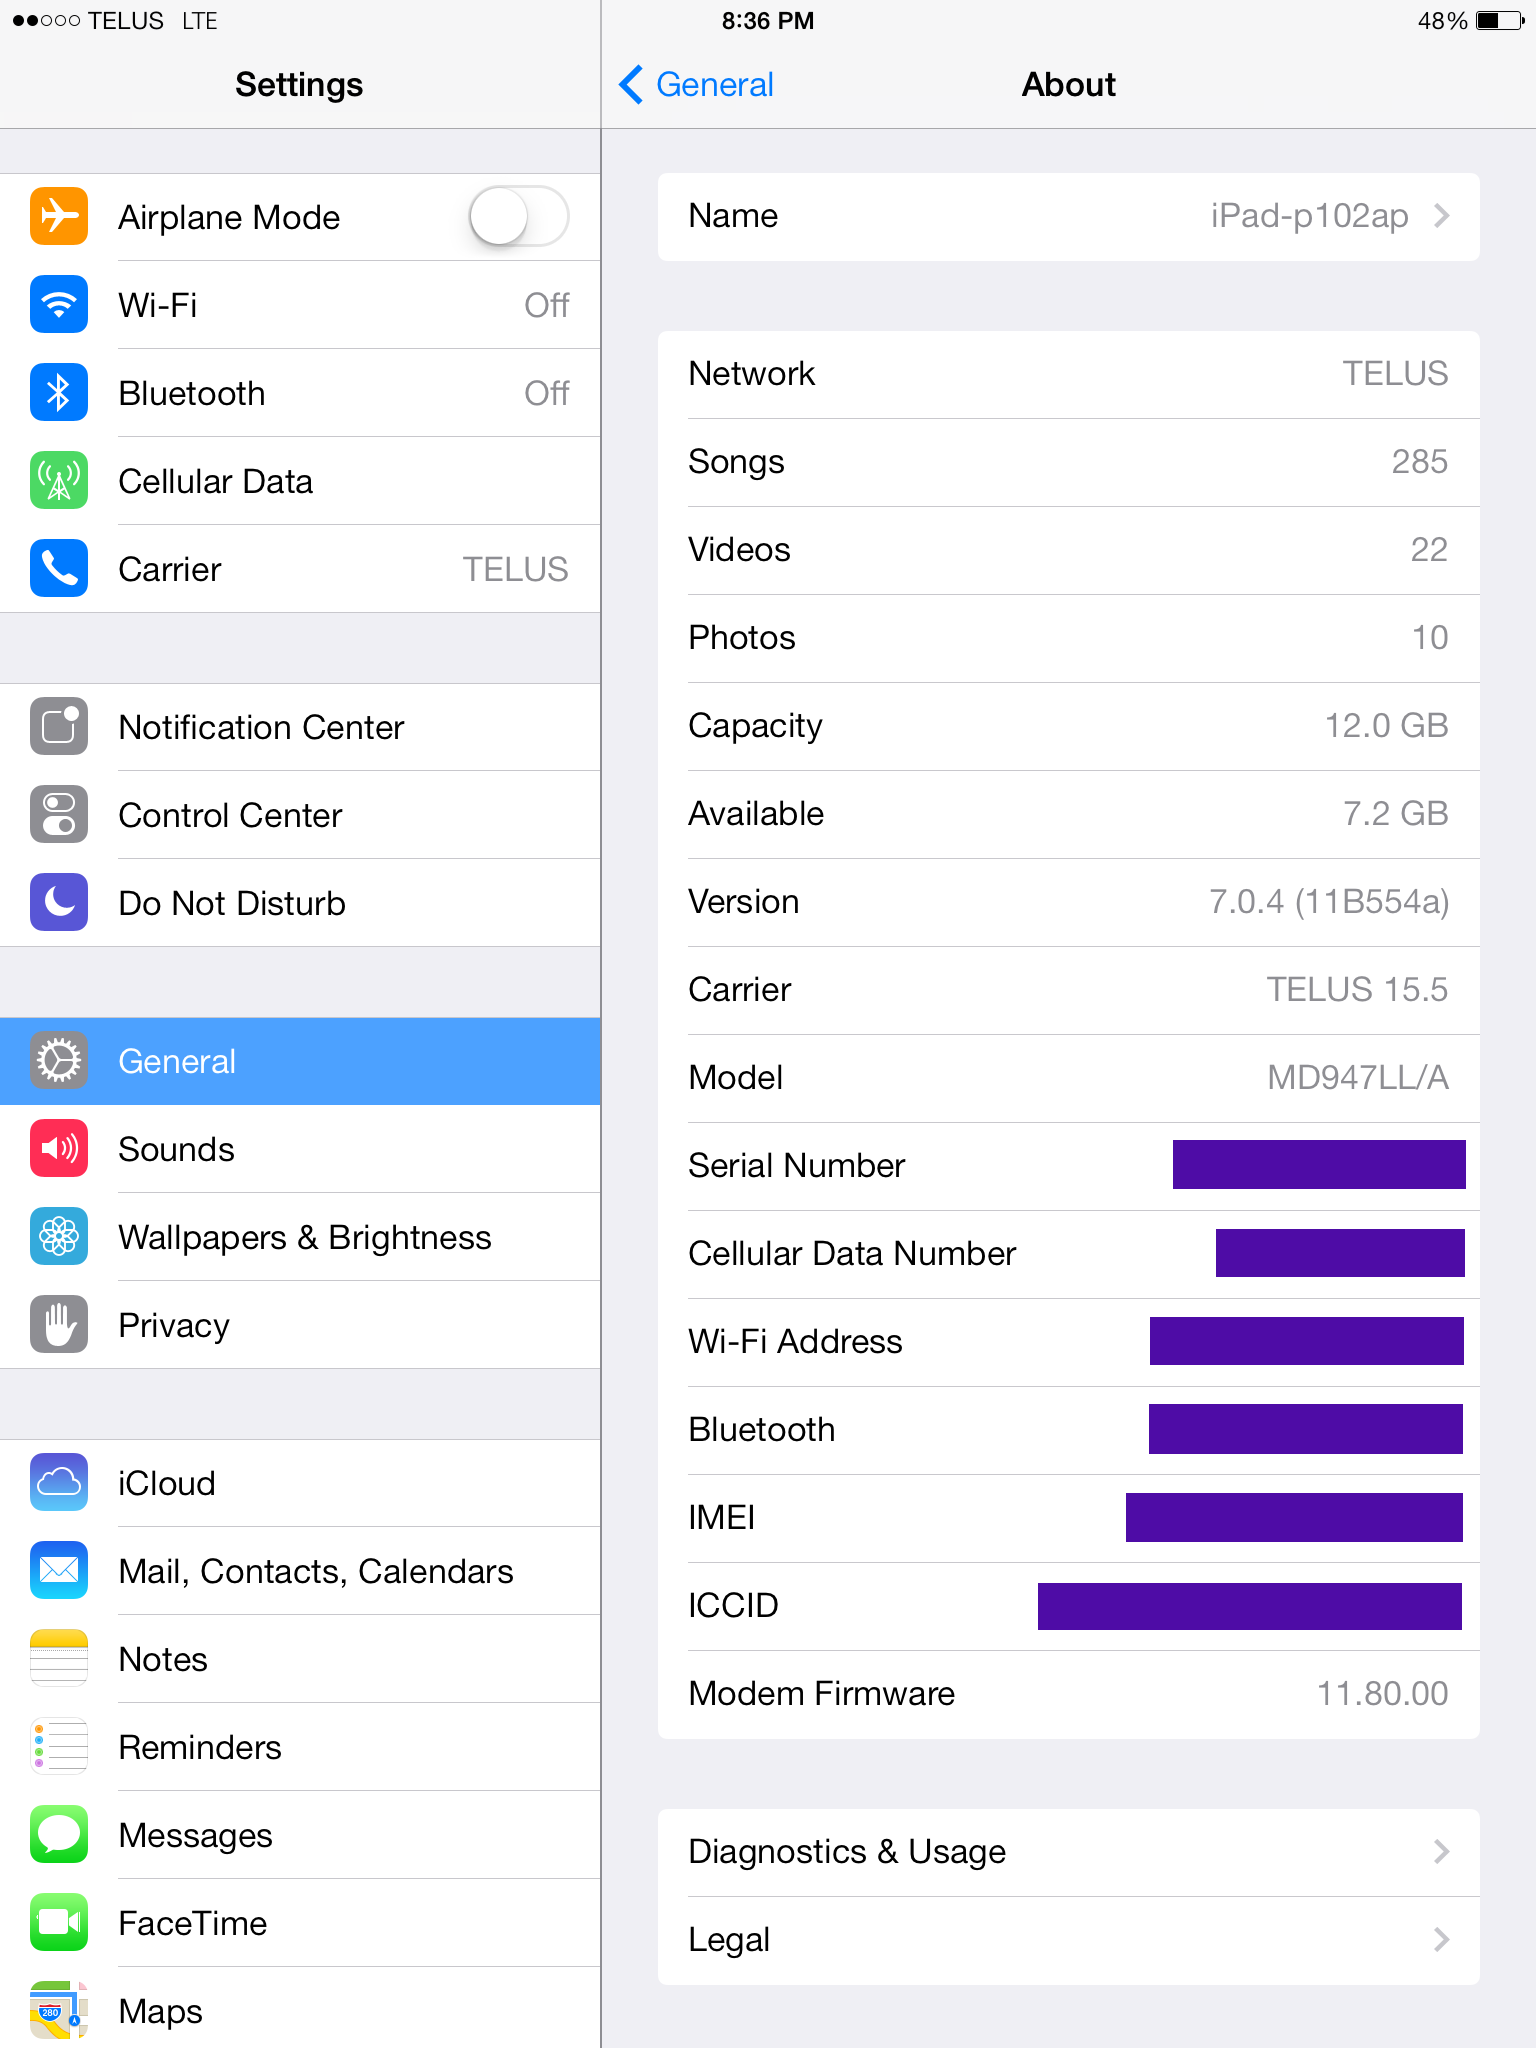
 If you look into your device settings, you should see that capacity has been reduced to 12 GB.
We are now ready to adjust the size of partitions within the GPT. To partition an iOS device disk which uses LwVM + GPT, we will use gptfdisk. This tool will allows us to edit the GPT partition table stored on /dev/rdisk0s1, then changes will be written back to the LwVM partition table stored on /dev/rdisk0.
Execute gptfdisk with the disk volume rdisk0s1 as argument.
iPad-k94ap#gptfdisk /dev/rdisk0s1
You might want to see first the current list of partitions of that GPT.gptfdisk>p
Partitionning on iOS is very limited compared to most other systems. To resize a partition, you have to delete it first, then recreate it. The issue with that is when the partition is deleted, properties and attributes are lost as well. If you simply recreate the partitions without original properties and attributes, you will get a bootloop.
In order to recreate the partitions with the same properties and attributes they had before deleting them, we can display informations about our current partitions with the following command. Note, we only have to check the data partition, since we will not touch the system one.
gptfdisk>i [enter]
2 [enter]
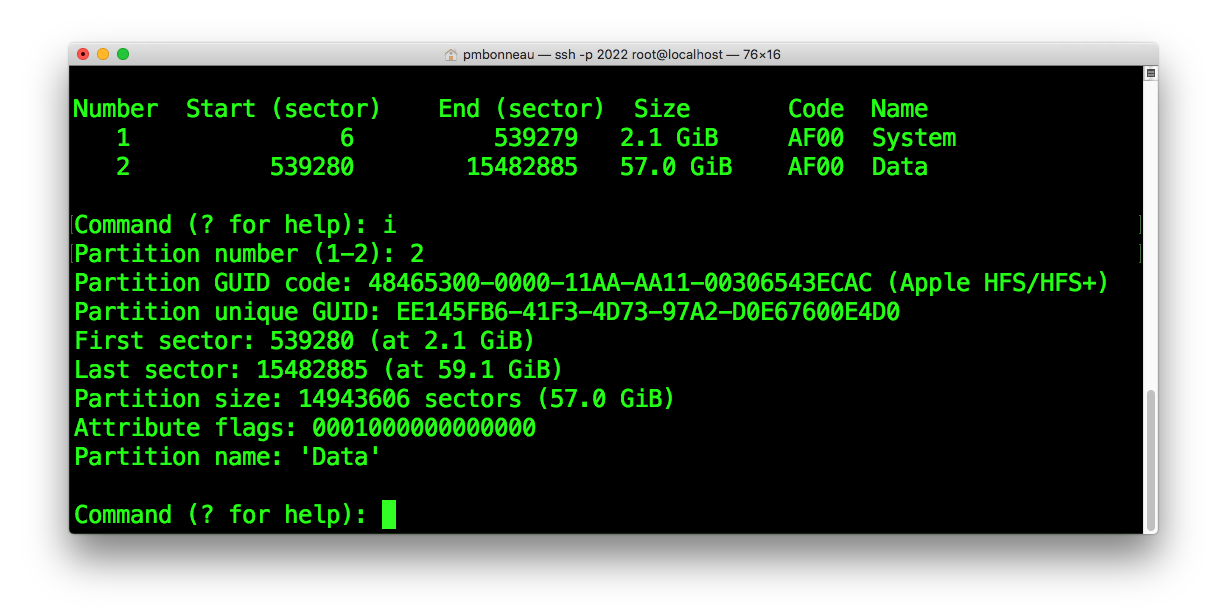 Write down in a text file the following information.
- Partition Unique GUID
- Attribute flags
Go into gptfdisk expert mode, then show attributes for partition 2.
a [enter]
2 [enter]
[CTRL+C]
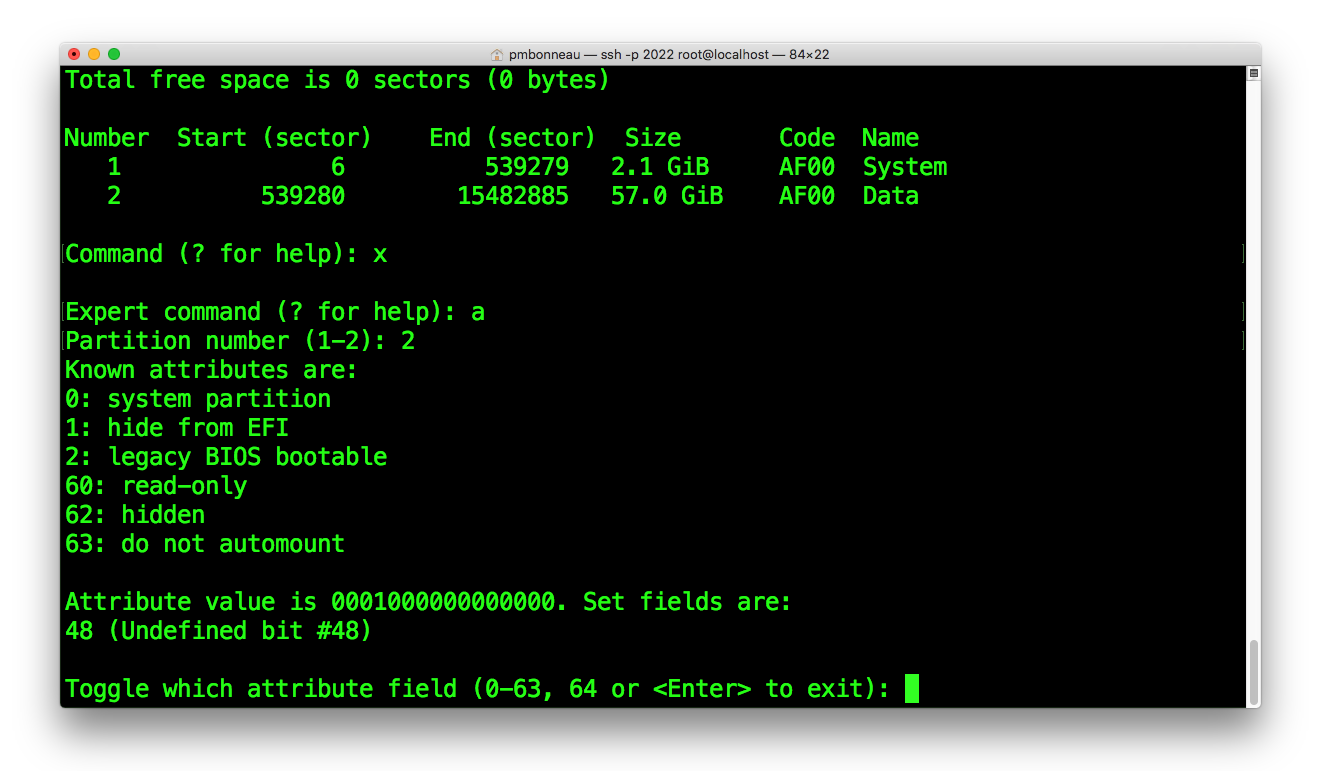 Go back to gptfdisk basic mode.
gptfdisk>m [enter]
Delete the Data partition :
gptfdisk>d [enter]
2 [enter]
Re-create the data partition with the same size that you set previously using hfs_resize. It was 12884901888 bytes (12 GB) for my 64 GB iPad.
gptfdisk>n [enter]
The first sector should be keep as default.[enter]
Take the size you have previously set in hfs_resize, then do the following maths.Divide it by [block size] value :
12884901888 / 4096 = 3145728 sectors. Normally, it should fits exactly to what you have calculed in your disk_partitions.txt file.
Add the default first sector value (this number is the currently allocated number of sectors) : 539280 + 3145728 = 3685008
Give this value to GPTfdisk.
[enter]
Keep the default Hex code.[enter]
Rename the recreated partition to Data.gptfdisk>c [enter] 2 [enter] Data [enter]
Verify that everything is right with the recreated partition :gptfdisk>p [enter]
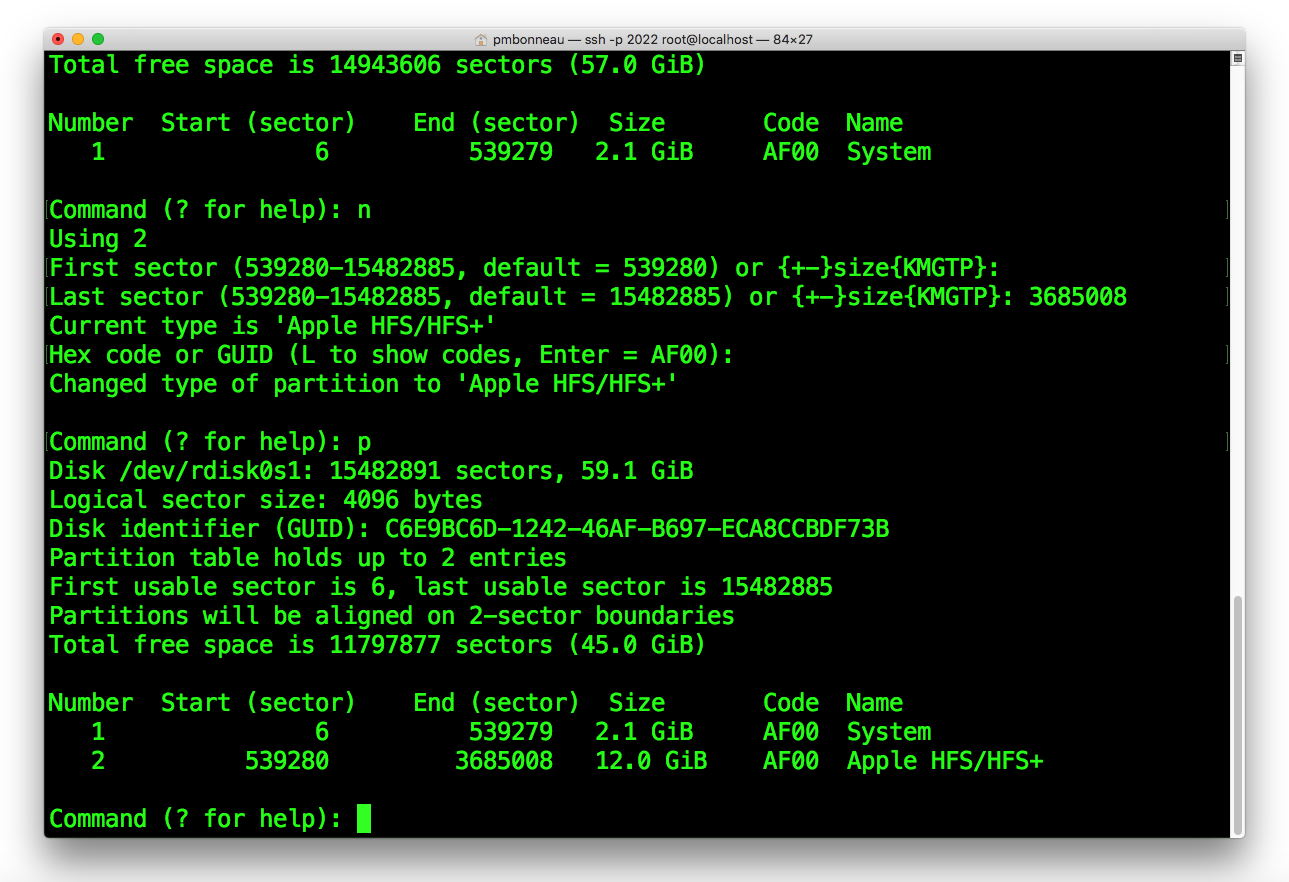 Seems all good, now let's restore Data partition attributes and properties.
The original Data partition had some attribute flags set to on. In order to make the recreated partition same as it was and avoid disk issues, we will put these flags to on for it.
Be sure you are in gptfdisk expert mode.
a [enter]
2 [enter]
48 [enter][enter]
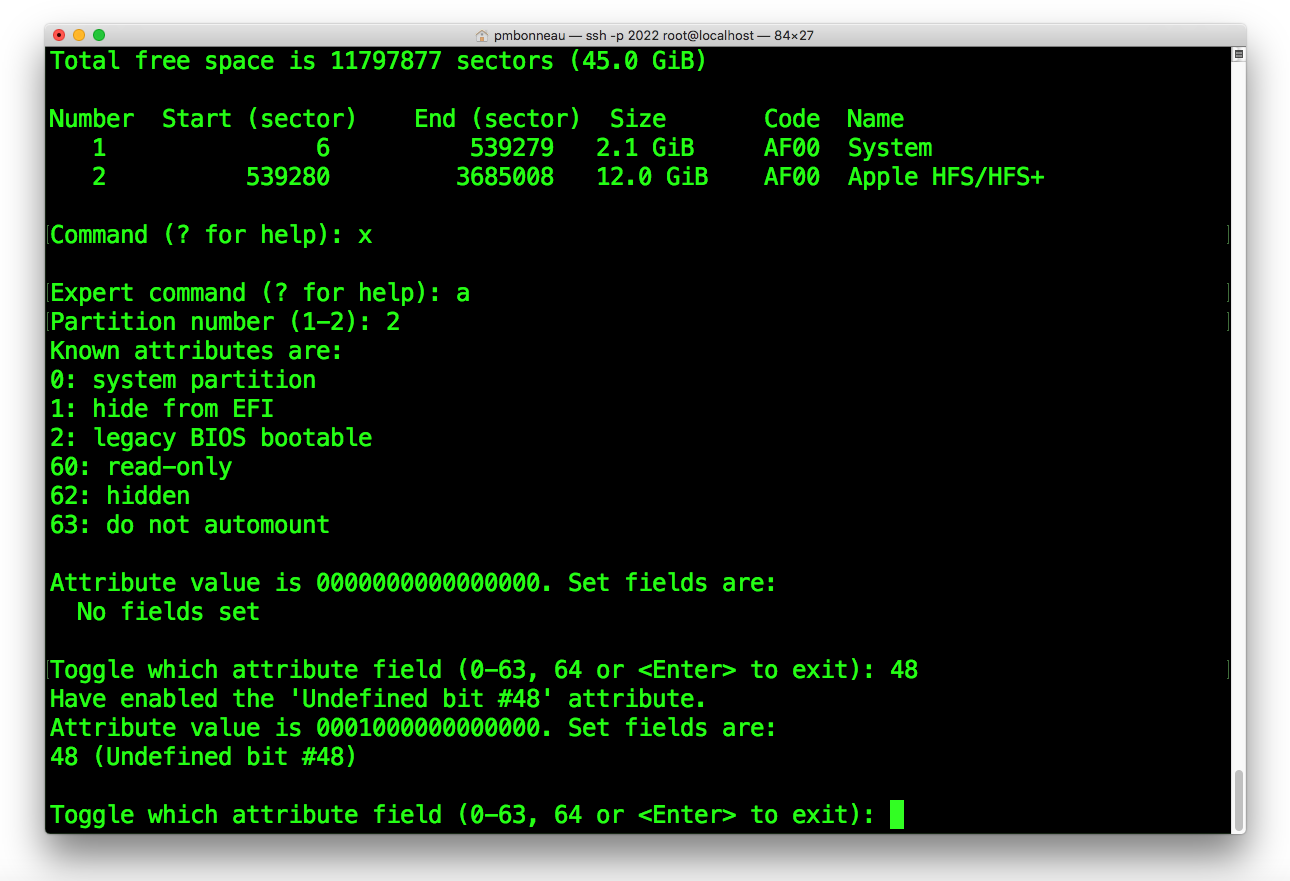 Enter the following commands to restore the partition GUID.
c [enter]
2 [enter]
[GUID] [enter]
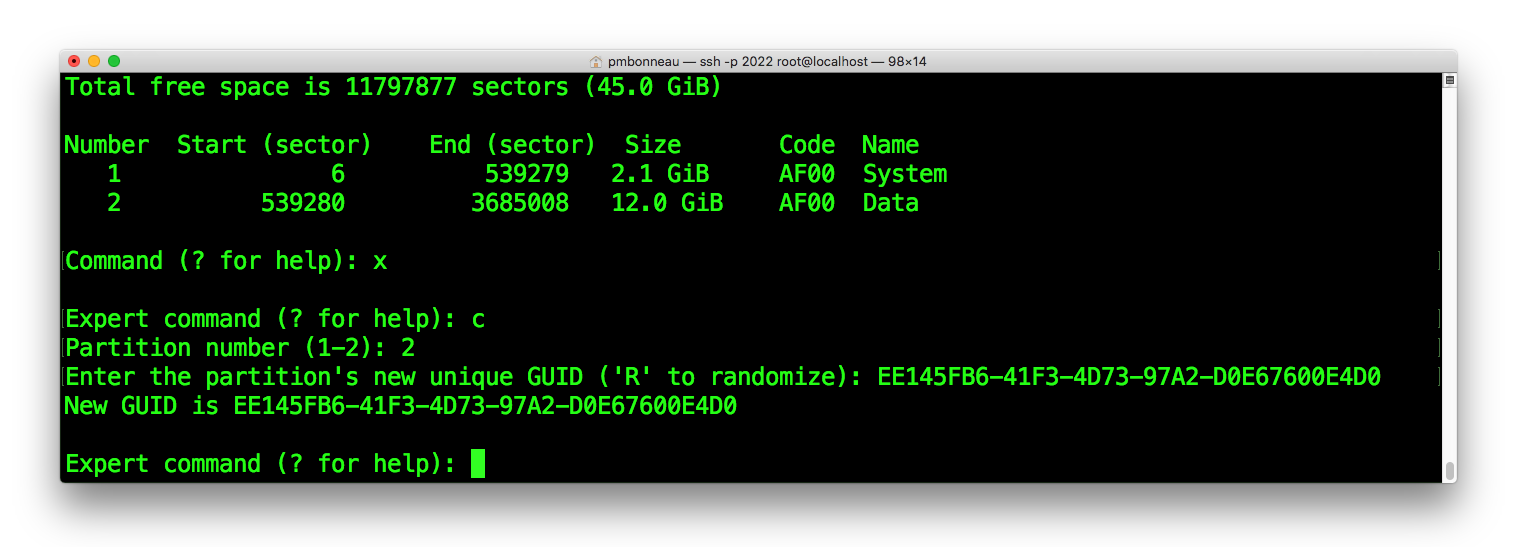 Our data partition is now completely resized, time to verify we did it right before write the stuff to the GPT. Go back to gptfdisk basic mode :
gptfdisk>m [enter]
Verify that the data partition as been properly recreated and that is has the right size :gptfdisk>p [enter]
Now the most dangerous thing of this writeup ever, write partition changes to disk.
gptfdisk>w [enter]
y [enter]
iPad-p102ap# sync; iPad-p102ap# sync; iPad-p102ap# sync;
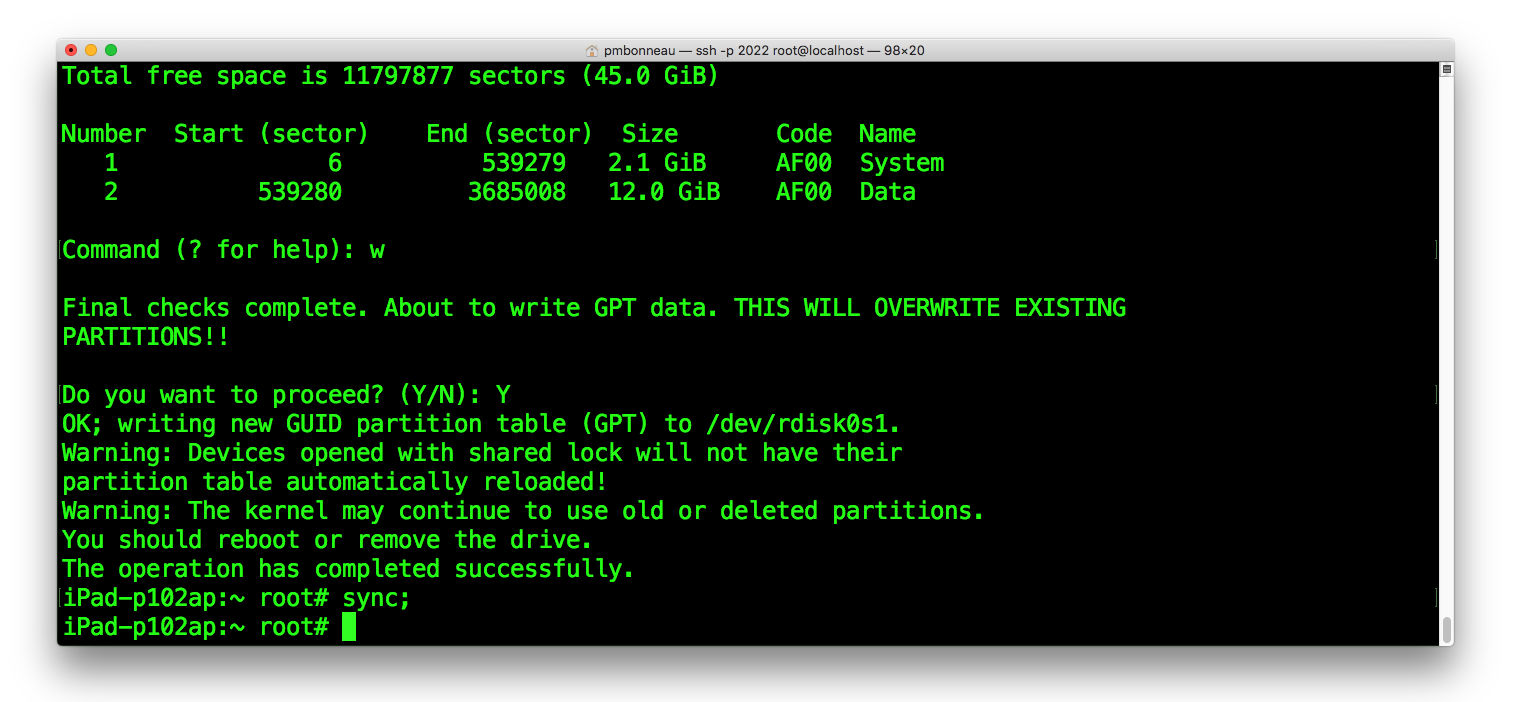 If your device gets frozen shortly after the new partition configuration is written, the probabilities are high that there is one corrupted partition. Force reboot the device, if you get a recovery mode loop, you will have to restore and start over.
Otherwise, the worst is behind us, we can now create the new partitions.
Execute again gptfdisk with the disk volume rdisk0s1 as argument.
If your device gets frozen shortly after the new partition configuration is written, the probabilities are high that there is one corrupted partition. Force reboot the device, if you get a recovery mode loop, you will have to restore and start over.
Otherwise, the worst is behind us, we can now create the new partitions.
Execute again gptfdisk with the disk volume rdisk0s1 as argument.
iPad-p102ap#gptfdisk /dev/rdisk0s1
Default partition table can only hold two partitions, we will expand it to allow creating more partitions.
gptfdisk>x [enter]
s [enter]
4 [enter]
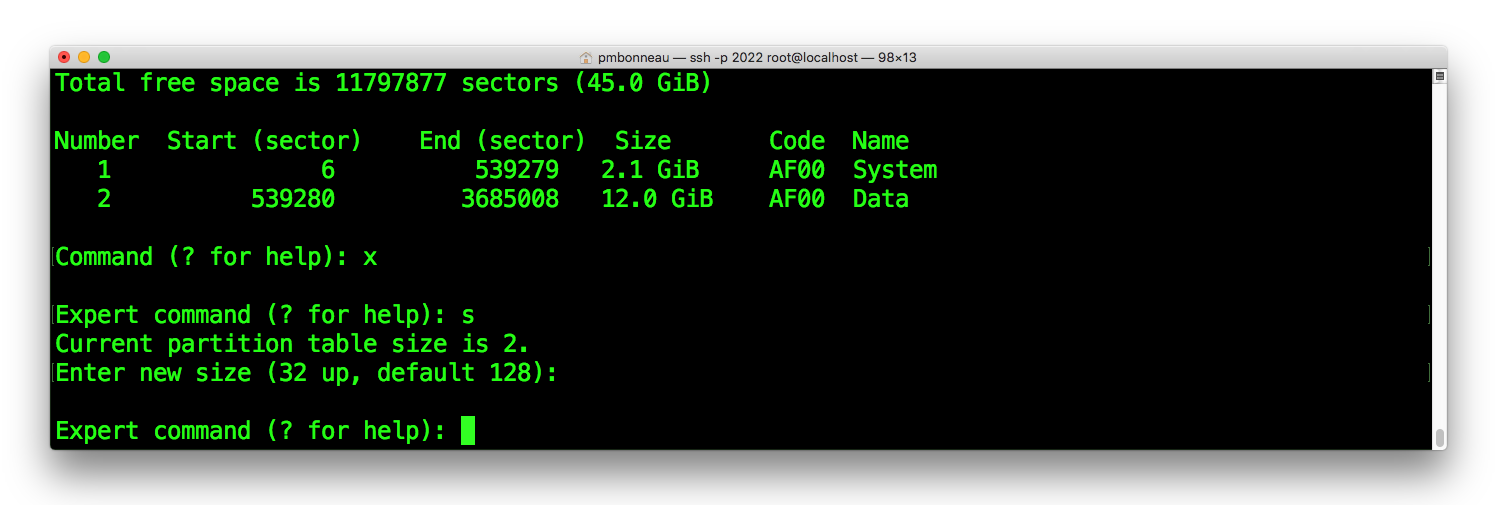 We will now create a third partition called Boot.
gptfdisk>n [enter]
3 [enter]
Keep default first sector [enter]
3685010 + 32768 = 3717778 The end sector for our "Boot" partition is 3717778.
[enter]
Keep the default Hex code.[enter]
Rename the recreated partition to "Boot" :
gptfdisk>c [enter]
3 [enter]
Boot [enter]
gptfdisk>n [enter]
4 [enter]
Keep default first sector [enter]
3717780 + 32768 = 3750548 The end sector for our "Boot" partition is 3750548.
[enter]
Keep the default Hex code.[enter]
Rename the recreated partition to "Exploit" :
gptfdisk>c [enter]
4 [enter]
Exploit [enter]
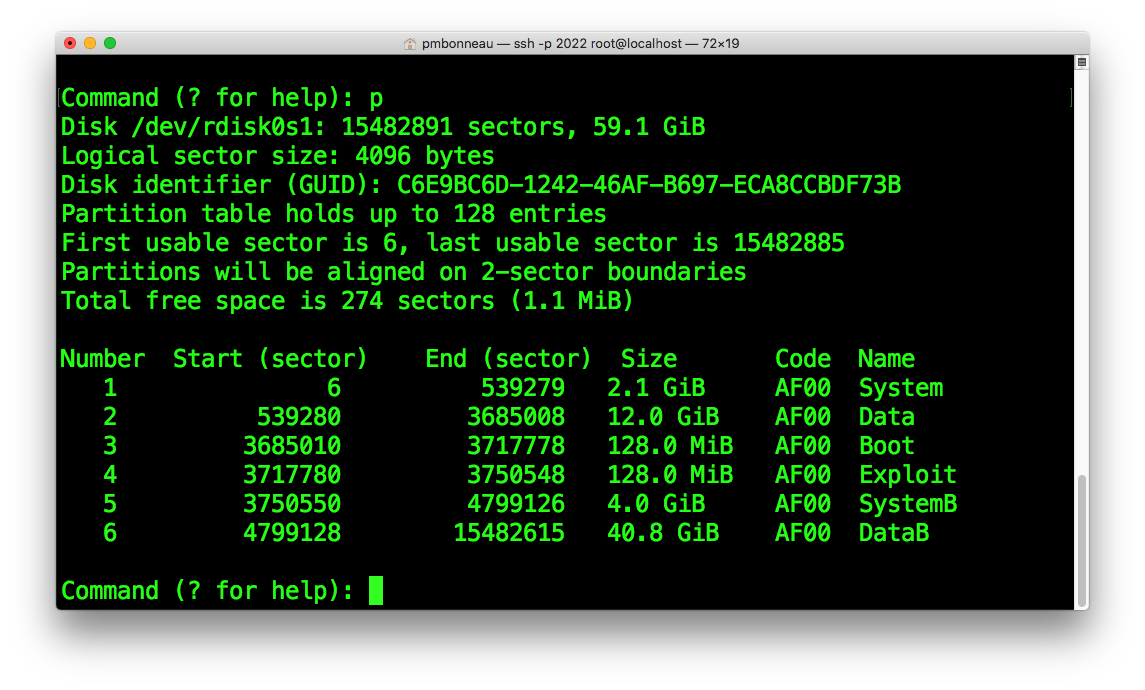 If everything is okay, write the partition table.
gptfdisk>w [enter]
y [enter]
iPad-p102ap# sync; iPad-p102ap# sync; iPad-p102ap# sync;
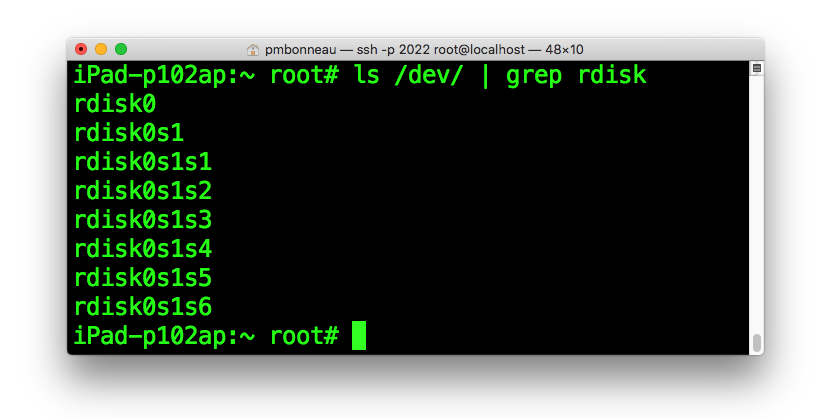
Verify that new disk devices were properly created :iPad-p102ap#ls /dev/ | grep rdisk
You should see at least six or more disk devices.- /dev/rdisk0 (LwVM device)
- /dev/rdisk0s1 (LwVM provided GPT)
- /dev/rdisk0s1s1 (System)
- /dev/rdisk0s1s2 (Data)
- /dev/rdisk0s1s3 (Boot)
- /dev/rdisk0s1s4 (Exploit)
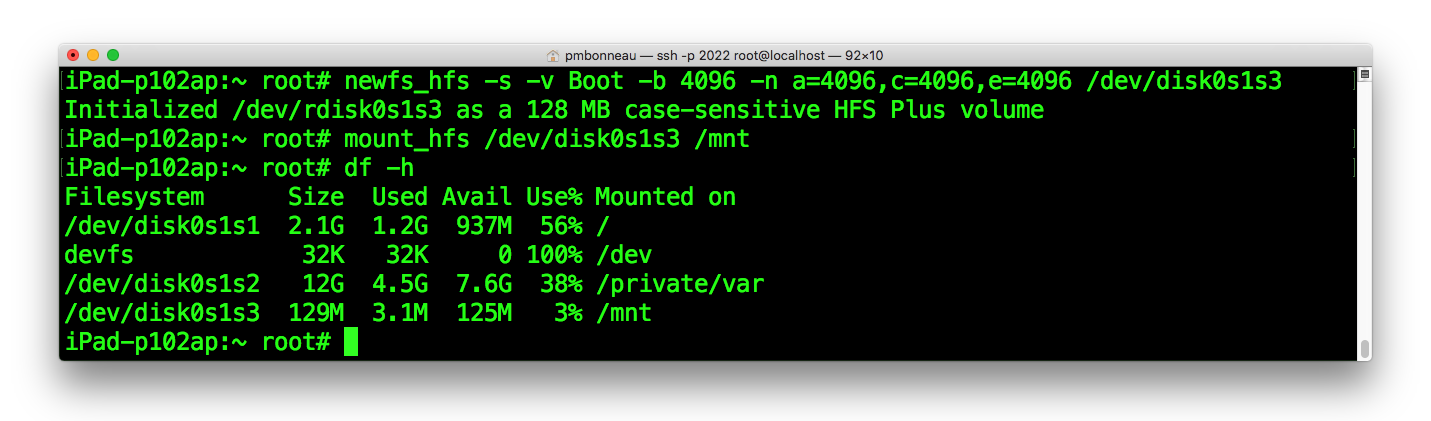
 You can right now format the "Boot" partition, so we will not forget to do it later. Invoke newfs_hfs with the same parameters you would use for a system partition like in a multiboot setup. Refer to my iOS multiboot writeup here.
/sbin/newfs_hfs -s -v [Label] -b [block_size] -n a=[block_size],c=[block_size],e=[block_size] [Device]
/sbin/newfs_hfs -s -v Boot -b 4096 -n a=4096,c=4096,e=4096 /dev/disk0s1s3
Mount the newly formatted partition into /mnt.mount_hfs /dev/disk0s1s3 /mnt
Check that it is properly mounted and has 128-ish MB size.df -h
 We are done with disk partitionning, we are all set and now ready to start working on the real thing!